A Guide to Almost Everything You Need to Know About Squatting
Author: George Barker
Introduction:
The deep squat is a fundamental, natural movement pattern that all humans should be capable of achieving comfortably. Through evolution, the deep squat is a position in which humans relax in, and is used by billions of people across the globe to sit in to eat, play games, socialise, or do a whole host of manual work. Examples of this squatting position are often seen in young children, developing countries across the world, and East Asia. This is sometimes referred to as a “third world squat”. As children, everyone is able to perform the squat, but most will lose this ability due to the first world’s comfortable chairs, sofas, toilets, cars, and generally sedentary lifestyle.
This is unfortunate, as this exercise is one of the best movements available for improving and maintaining a whole host of things, including:
- Ankle, hip, knee and back mobility
- Development and activation of the muscles of the lower limbs, largely the glutes and quadriceps
- Neuromuscular patterns (sequence of muscle contractions) of the legs and back musculature
- Walking and running gait
- Jumping
- Back pain and discomfort
- Knee pain and health


Anatomy of the Squat:
The squat is a whole-body movement. As such, there are a plethora of muscles and bones involved. However, for the sake of not over-complicating things, there are just four main bones or groups of bones, three joints or groups of joints, and seven muscles or groups of muscles that need to be looked at (4).
Bones:
Spine:
The spine runs from the base of the skull to the top of the pelvis, and consists of 24 vertebrae (1). These are split into three general sections based on their curvature: seven cervical vertebrae in the neck, twelve thoracic vertebrae form the base of the neck to the bottom of the rib cage, and five lumbar vertebrae running from the base of the rib cage to the top of the pelvis.
Individual pairs of vertebrae have limited movement between them, however when transferred along each joint, this allows for fairly large degrees of flexion, extension, rotation and lateral flexion along the spine. In a well performed squat, there shouldn’t be much flexion or extension taking place. Instead, the spine should remain rigid and extended to effectively transfer force from the legs and hips to the bar (4).
Pelvis:
The pelvis is made up of six bones which are fused together, with each side effectively mirroring the other. The point at which these bones fuse together on each side, forms the hip socket (acetabulum). The pelvis also forms the attachment points of some important muscles in the squat, including the rectus femoris (one of the quadriceps) and the hamstrings group (1).
Femur:
The femur is the bone which makes up your upper leg, and runs from the hip to the knee. The femur is the origin and insertion point of a large number of muscles that are critical for squatting, such as the gluteus maximum, three of the quadriceps, the adductor group and the gastrocnemius (the larger calf muscle) (1).
The bottom of the femur, called the femoral condyles, form the top part of the knee joint. These are cushioned by the menisci (pads of cartilage in the knee joint), and are attached to the tibia (shin bone) via the four major ligaments of the knee: the anterior cruciate ligament (ACL), posterior cruciate ligament (PCL), medial collateral ligament (MCL), and lateral collateral ligament (LCL) (1).
Tibia and Fibula:
The tibia and fibula make up the bones of the lower leg, running from the knee to the ankle. The tibia has its own set of condyles that meet the femur at the knee, forming the knee joint. The hamstrings also insert just below the knee joint on the back side of the tibia (1).
Joints:
There are three main joints which are involved in the squat. Adequate mobility and stability at the joints are important to enable full range of motion, as well as optimal mechanics and injury risk reduction during the squat.
Hip:
The hip is a ball and socket joint, which means it can move in all planes of motion, much like the shoulder. Anatomical variations of the pelvis, hip socket, and femur largely determine how large of a range of motion you’ll be able to achieve in each of those movements.
Knee:
The knee is essentially a hinge joint, meaning it primarily only allows flexion (like a leg curl) and extension (like a leg extension). It can allow for small amounts of rotation, abduction and adduction, but more than a few degrees of each can put excessive strain of the knee ligaments and menisci.
The patellar, or knee cap, improves the quadriceps ability to pull against the tibia and cause knee extension.
Ankle:
The ankle can rotate, invert and evert. During the squat however, only plantarflexion (pointing the toes/foot away from the body) and dorsiflexion (pulling the toes/foot towards the body) are important, or wanted (read my previous article on the foot for more on this here). Dorsiflexion range of motion is key for a deep squat, and is often limited in the adult population for a number of reasons including footwear, and weakness of the muscles surrounding the ankle.
Muscles:
Spinal Erectors:
The erectors are made up of a number of smaller muscles, which all essentially work to extend the spine from the hips to the skull. The erectors attach to the top of the pelvis, the ribs, and the spine (1). Due to each individual muscle only crossing a few vertebrae, it is possible to have strength disparities in different parts of the spine. As such, strength of each region should be targeted specifically.
“Core”:
This is a catch-all term for all of the muscles between the neck and the hips that help keep the torso braced and rigid that don’t play quite as direct of a role as the spinal erectors. This includes the obliques, transversus abdominis, rectus abdominis, psoas, latissimus dorsi, and quadratus lumborum (4).
None of these muscles are worth addressing specifically in this article, since none of them play a massive role individually. However, they must be able to produce enough tension to aid the spinal erectors in keeping the spine braced and stable.
Gluteus Maximus:
The gluteus maximus is the strongest hip extensor in the body. Because of this, it is incredibly important in standing up again when squatting.
Hamstrings:
The hamstrings group consists of three muscles which work to extend the hip and flex the knee. Due to their hip extension function, they play a role in standing up in the squat. For a more comprehensive look at the hamstrings, read my recent article on the subject here.
Adductor Magnus:
The adductor magnus is a large muscle on the inside of the thigh, and is another powerful hip extensor. In fact, a recent study has shown that it may produce a largest hip extensor moment than the glutes and hamstring together at the bottom of the squat (5).
Quadriceps:
The quadriceps all work to extend the knee. Three of these (vastus medialis, vastus lateralis and vastus intermedius) only extend the knee. The fourth, the rectus femoris, also flexes the hip. These powerful knee extensors are vital to squat performance.
Calves:
Comprised of two muscles, the calves both plantar flex the foot. The smaller of the two, the soleus only crosses the ankle, and so is a sole plantar-flexor. The gastrocnemius however, crossed both the knee and the ankle, and so is a plantar-flexor and a knee flexor (1).
Squat Technique:
So, we have covered all of the major muscles, joints, and bones involved during the squat, and you should have a fairly solid grasp of the anatomy at work. In this next section, squat technique will be discussed. The squat can be split up into three phases: the setup, the eccentric (descent) phase, and the concentric (ascent) phase.
The Set-Up:
Often overlooked, the set-up is actually an incredibly important part of any squat, especially when heavy loads are involved. There are a number of factors to consider during the set-up of the squat, and whilst many of these apply mostly to barbell squatting, they can be transferred to other types of squat such as using kettlebells, medicine balls or dumbbells.
It is important to note that there are very few black and white answers for the topics in this section, as each can vary greatly dependent upon individual variations in limb lengths and mobility limitations. However, this will be covered so you have the ability to optimise your set-up.
Bar Placement:
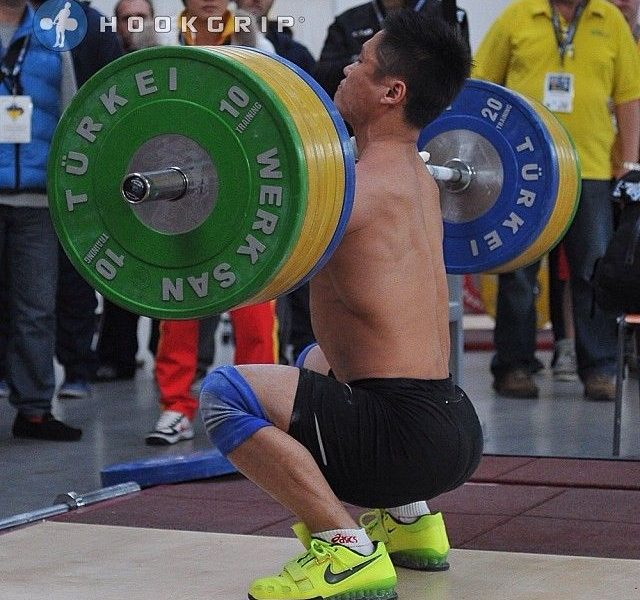
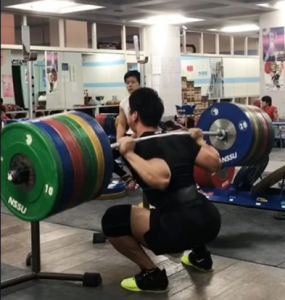
Where the bar is placed on the body will greatly affect the rest of the set-up, and subsequent lift, so it is important to get this right. The three basic bar placements in the squat are the high bar, low bar, and front (4).
In the high bar squat, the barbell will be resting on your trapezius muscles (or traps). This position can vary slightly depending on comfort to either have the bar placed on top of the traps, or slightly lower so it is on the meat of the muscle (4). Either way, it is important to avoid resting the bar on the C7 spinous process (the bony prominence at the base of your neck), as this will be painful.
In the low bar squat, the bar is placed lower down the back on the posterior deltoids. This placement will mean the torso inclines to a greater degree during the squat, and most people will find they can squat slightly more weight with this bar placement (4).
Finally, in the front squat, the bar is resting on the front of the shoulders, between the anterior deltoid and the neck (2). This position is often uncomfortable at first, but the front squat is great for strengthening the spinal erectors and learning good squat technique.
Hand Position:
In general, for both the high and low bar squats, it is ideal to place the hands as close as comfortably possible. This allows for a more stable shelf to be created by the back musculature to keep the bar in place, and the body in tension. You should be squeezing your shoulder blades together, and a narrower hand position helps with this.
For the front squat, there are a few more options dependent on your mobility. The first is called a “front rack”. In this position, the hands will be slightly wider than shoulder width, with elbows pointing in front of you. A full grip on the bar is best, however, maintain as many fingers on the bar as comfortable as the shoulders should be supporting the load anyway, not your hands or wrists. If mobility restrictions do not allow for this position, lifting straps can be placed onto the bar and held onto as close to the bar as possible.
If the front rack is not possible to achieve, the “crossed arms” position can be used. Once the bar is resting on the shoulders, the arms are crossed out in front, and the hands are placed on top of the bar to keep it in place. This position is generally less stable than the front rack, so it is advisable to try and improve shoulder mobility. However sometimes this is the best option.
Elbow Position:
The elbows generally want to be pulled down into your sides, so they are approximately in line with the torso throughout the lift. This helps to create more tensions through the upper back as well as maintaining torso rigidity.
However, depending on external rotation ability, the elbows may need to be allowed to push up behind the bar. This can cause the chest to cave forward during the ascent of the squat, so it is best to try and work on keeping them down.
During the front squat, the elbows should be pushed up high. This helps to keep the thoracic spine in extension, stopping the torso from collapsing over. As well as this, it creates a better shelf for the barbell to sit in.
Walkout:
Once you have figured out where the bar is placed, and where the hands and elbows are, you then have to get the bar out of the rack and into your squat position.
The bar should be placed in the rack at a height where you do not have to either half-squat it out, or rise up onto the toes. Then, either place both feet directly under the bar, or take a slightly staggered stance (whichever feels most comfortable and stable). A deep breath should be taken in, and tension should be created throughout the body in preparation for accepting the load. Lift the bar out of the rack by standing the legs up straight and driving the shoulders into the bar.
Once the bar is lifted, as few steps as possible should be taken to get into position. This tends to be between 2-3 steps. In a two-step walkout, take a small step back with one foot, then bring the other foot level, before making any minor adjustments to toe angle. If doing a three-step walkout, take a half step backwards with one foot, then a full step with the second, and then bring the first foot back to meet it.
An important thing to note: ALWAYS WALK BACKWARDS OUT OF THE RACK. Never face away from the rack and walk forwards to set-up. This is incredibly dangerous, as when placing the bar back in the rack at the end of the set, you must walk backwards while fatigued and are unable to see where the bar is going. This is just asking for a disaster to happen and potential serious injury. So I will repeat one more time: ALWAYS WALK BACKWARDS OUT OF THE RACK.
Stance Width:
Finding your stance width is the next issue, and this will vary greatly from person to person due to limb lengths, anatomical variations, and mobility. Generally, it’s best to start around shoulder width, and see how it feels, then move the feet inwards or outwards a small amount, and see which feels most comfortable. See how deep you can squat with each position without letting the back round, and feel how stable and comfortable you feel in each position. Stick with the stance which gives the best combination of comfort and depth.
There are specific situations where stance width may want to be changed to target different muscles more than others, or for better carryover into a chosen sport or activity. However, these are specific circumstances, and in general the most comfortable squat stance you find will be fine for all purposes.
Foot Angle:
Foot angle will vary from person to person, dependant upon stance width, hip mobility, ankle mobility, and anatomical factors. Generally however, the toes will want to be pointed out anywhere from 10° to 45°. Whatever the foot angle is however, the knees MUST be able to track over the toes still during the descent (generally the 1st or 2nd toes). Thus, toes that are more pointed out will require greater hip abduction in order to keep the knees out, and more forward pointing toes will require more ankle dorsiflexion mobility as the knees travel further forwards. Play around with this to see what feels most natural and comfortable.
A second factor to consider when determining foot angle is balance. As the toes become more turned outwards, the feet essentially become ‘shorter’ from front to back when viewed from the side, reducing the size of the base of support. This means that if you misalign a lift, losing balance forwards or backwards is more likely when the toes are turned out to an extreme degree.
Bracing:
Bracing the torso is a crucial part of any squat when under load. Whether using a barbell, dumbbell, kettlebell, or any other implement, effective bracing is key. This is a large topic area that could have its own article dedicated to it, so I will keep it brief and simple.
Bracing allows for a rigid torso, which in turn allows for efficient force transfer from the floor, through the legs, and up into the bar. If the torso is not braced properly energy will be lost, causing the body to bend under the load. This makes the lift much more difficult, can result in a missed lift, and increases risk of injury.
The idea of bracing is to inflate your torso 360°, it is not simply tensing your abdominals. During effective bracing, the shoulders and chest should not rise much, if at all. Instead, the stomach and lower torso should inflate and create pressure in a cylindrical fashion.
In order to do this, there are a few cues which may be of use when learning how to brace properly:
- Breathe into and inflate your lower back
- Inflate the obliques
- Breathe into your stomach
Creating Tension:
Once the core is braced, tension then needs to be created throughout the rest of the body.
For the upper body, much of this tension has already been set through bar placement, hand position and elbow position. The shoulder blades should be squeezed together, and the bar wants to be pulled down into the body, like you’re trying to bend it over your shoulders.
Lower body tension should first be created by the feet. Balance should be equally distributed across three points of the foot; the base of the first toe, the base of the fifth toe, and the heel. A “short foot” position should then be formed (read my recent article on the foot for more on this here). Tension should then be created through the legs and hips. Some cues which may help to do this are as follows:
- “screw the feet into the floor” – With the feet firmly planted, externally rotate the hips, like you’re trying to point your heels toward each other, and your toes toward opposite walls. You may feel the outside of your foot pressing firmly against the wall of your shoe (2).
- “Spread the floor” – Imagine a fault line opened up between your feet, and you’re trying to drive your feet apart to rip the crust of the earth in half (2).
Setup in a Nutshell:
- Choose your bar position.
- Grip the bar as close as comfortably possible.
- Keep the elbows under the bar to create tension in the upper back. In a front squat, keep the elbows high.
- Walk the bar out, using as few steps as possible to conserve energy.
- Place the feet in your preferred width, and toe angle.
- Take a deep breath to effectively brace the core.
- Create tension throughout the body from head to toe.
The Eccentric Phase:
The setup phase requires a lot of explanation and depth as it forms the foundation for everything else to come. Now that’s out of the way, it’s time to get into the squat. These next two phases will require a lot less explanation, and should be a little shorter to read!
The eccentric phase, or the descent, begins at the top of the lift, and ends when you are down in your bottom position.
Cueing the Eccentric:
There are a few cues which can be used during the descent of the squat. These generally take some form of either “sit down” or “sit back”. In my opinion the “sit down” cue is better, and when coaching the squat, it is what I would tend to use for most people. This cue generally allows for a more upright torso, greater knee flexion, and greater depth.
When squatting using the “sit down” cue, the idea is to break at the knees and hips simultaneously, and sit the buttocks directly down onto the heels whilst keeping the torso as upright as possible. However, limited ankle mobility can mean that maintaining an upright torso isn’t possible when using this cue. There are three things that can be done in this situation: 1) Raise the heels for a short term fix, 2) improve ankle dorsiflexion over the long term and 3) use the “sit back” cue.
If the ankles range of motion is limited, and the knees cannot travel forward far enough, using the “sit back” cue can be more beneficial. This will tend to limit the depth of the squat, however most people should still be able to reach parallel. The idea of this cue is to break at the hips first, pushing the buttocks backwards as the torso inclines. Imagine you are trying to sit back and down into a chair that is quite far behind you.
In general, there isn’t much difference between the two squats. Maintaining a more upright torso and sitting straight down will hit the quads slightly more and allow for slightly better hypertrophy due to the increased range of motion. Sitting back and allowing the torso to incline more will often allow for slightly more weight to be lifted due to the reduced range of motion. However, comfort, mobility, and the ability to get deep with good form is what should determine your style.
Maintaining Tension and Control:
The tension created during the set up should be maintained throughout the lift. The eccentric phase is not simply sitting down and relaxing into the bottom, in fact the opposite is true.
One way in which to maintain this tension is to control the speed of the descent. Try a 5, or even 10 second descent, keeping tight and controlled throughout the lift. By slowing down how fast you drop into to the bottom position, it is possible to feel any points throughout the lift which may be weak and need focusing on, and also allows the correct tension to be maintained when learning the movement. Over time, the speed of the descent can be increased, which allows for better utilisation of the stretch reflex, or “bounce” out of the bottom. However, even during a fast eccentric, control and tension should be maintained. Thus, correct technique and a slow pace should be mastered first.
Depth:
How deep should you go? The simple answer is as deep as possible (whilst maintaining control).
The depth of the squat will vary from person to person, as well as where the loading is on the body. Many people will be able to squat deeper in a front or goblet squat than a low bar back squat for example, due to the load being in front of the body. Depth will also vary depending on anatomical structures of the hips and ankles, as well as mobility restrictions in these areas.
Deep squats allow for greater muscle growth (3), gain more strength, and transfer better to most athletic activities. There is also no increased injury risk in squatting deep compared to only completing half or quarter squats, as shown in a recent review of the literature (1). In fact, it is likely that deeps squats will decrease risk of injury in these body parts as the muscles and tendons adapt, becoming stronger and more mobile in order to cope with greater loads.
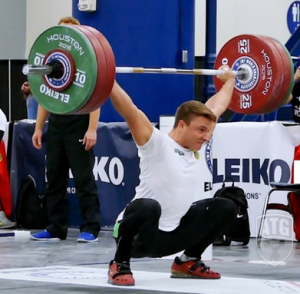
The Concentric Phase:
Now you have a solid setup, and have completed a controlled descent into the bottom position whilst maintaining tension throughout the body. Now for the hard part: standing it back up.
The concentric phase, or ascent, begins in the bottom position, and ends back at the top of the squat with the legs and hips stood up straight.
Beginning the Ascent:
When beginning to ascend out of the bottom of the squat, drive the shoulders aggressively up into the bar, and imagine pushing the floor away with the legs. By doing this, you are aiming to keep your torso upright, hips under the bar, and knees tracking over the toes. Another important point to note is to explode upwards aggressively during the ascent, generating as much speed as possible whilst maintaining good technique. Not only will this make the squat feel “easier”, but it will help improve your strength gains! (3).
It is important to avoid caving forward, this is achieved by not allowing the chest to drop and hips to rise dramatically. A more inclined torso reduces the legs efficiency at being able to work, and forces the hip extensors and back to work harder, turning the squat into more of a “good morning” exercise.
Sticking Point:
The sticking point usually occurs approximately half-way up during the ascent of the squat, and is where the body is in its least mechanically efficient position, so for the most part it is unavoidable. However, there are a few things that can be done to help push through this portion of the squat as quickly and efficiently as possible.
Ideally, enough speed is generated when exploding out of the bottom to push through the sticking point without slowing down much at all. However, if this doesn’t happen, the best strategy is to continue to drive the shoulders back into the bar aggressively, while simultaneously trying to drive the hips under the bar. This will likely cause the knees to shift forward as well (2). Grinding through the sticking point and maintaining good technique (not allowing the hips to shoot up and torso to cave forwards), will help keep the body in its strongest possible position from a mechanical standpoint, and increase the chances of successfully completing a difficult lift.
Common Issues with the Squat:
Whilst not the focus of this article, this section will very briefly go over some common issues seen in the squat.
Ankle Mobility:
Restricted ankle dorsiflexion mobility is one of the most common factors which limit depth during the squat. Improving the ability for the ankles to dorsiflex allows for the knees to travel further forward, and the torso to remain more upright when squatting.
In order to improve ankle mobility, strengthening the calves and tibialis anterior through their full range of motion is a good place to start. Doing some soft tissue work to the lower leg and Achilles tendon prior to squatting can also help improve range of motion in the short term.
Hip Strength and Mobility:
The hips need to have adequate strength and ability to flex (bring the thigh towards the chest), externally rotate, internally rotate, and abduct (open away from the centre of the body) in order to squat effectively. Without these, the movement pattern will be restricted in some way.
Thoracic Spine Strength and Mobility:
The spine needs to be able to fully extend during the squat, and stay extended throughout. Restrictions or weakness in the upper back can lead to the chest collapsing forwards during the squat, often resulting in a failed lift. This issue will be exaggerated to a greater extend during the front squat, where greater demands are placed on the strength of the upper back.
Core and Quadriceps Strength:
The core must be strong enough to remain rigid throughout the squat. Imagine the torso like a pillar of stone. Any flexion, or collapsing of the spine caused by either weakness or inefficient bracing will increase the chances of missing a lift dramatically.
The demand on the quadriceps is greatest in the bottom of the squat. If the demands on the quadriceps outweigh their ability to produce force, the hips are forced to take over. When this happens, the knees shift backwards, and the hips shift back, and the torso leans forward. Instead of maintaining a constant back angle out of the hole, the torso tilts farther forwards, resulting in a “good morning” position. Ideally, the hips and knees want to extend at the same rate, and often times improving quadriceps strength can help with this.
Examples of Squat Variations:
The high bar, low bar and front squat with a barbell have all been covered in this article already, however these variations are not appropriate or possible for all people, and so a number of squat variations will be covered here to ensure everyone can get the most out of this great movement!
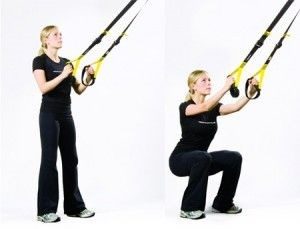
TRX Squat:
This squat variation uses the TRX bands, or any other kind of similar rope-like equipment in order to help balance, and should allow for much larger ranges of motion at the knee joint. These are great for beginners, or those who lack ankle and thoracic mobility and are unable to achieve good depth in a conventional squat. Simply hold onto the TRX handles, take your squat stance as spoke about above, lean back to create tension on the bands, and squat down!
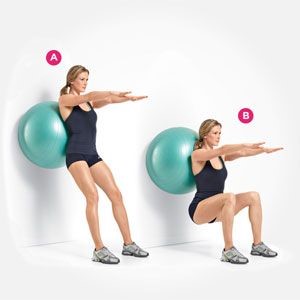
Swiss Ball Squat:
The Swiss ball squat is similar in nature to the TRX squat, in that it makes it easier to reach full depth by removing such high balance and mobility demands.
Place a Swiss ball on the wall behind you, and lean back against it at approximately the height of the lumbar spine (low back). Take your squat stance, and squat down, keeping pressure on the ball to maintain balance.
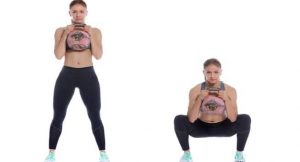
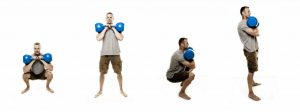
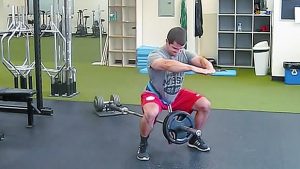
Goblet or Kettlebell Squat:
The Goblet or kettlebell squat resemble the front squat in that the load is on the front of your body. This weight helps to counterbalance your body, and will often allow for greater depth alongside challenging your core strength to stay upright.
Take a dumbbell or kettlebell (or two kettlebells), and hold it in close to your chest. If using a kettlebell, the front rack position can be used. All the same points around stance width, toe angle, bracing and technique on the squat apply here, except you don’t have to worry about the barbell.
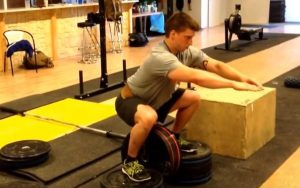
Belt Squat:
The belt squat is useful to really isolate the legs, and also for those with back issues where spinal loading can cause pain and/or discomfort. You may have to get a little creative with the set-up for this movement, but it’s worth it!
You will need either a dip belt, some way to attach a weight to your waist, a landmine attachment, or if you are lucky and your gym has one, a belt squat machine. If using a dip belt, place a weight on the chain so it is hanging between the legs. Either a plate, kettlebell or dumbbell can work well. You will likely need to have your feet elevated due to the weight hanging down, so finding some boxes or benches to put each foot on is a good idea. Then, using the techniques outlined above, squat down to a comfortable depth before returning to the top.
Heels Elevated Squat:
This squat variation utilises a heel raise to allow the torso to stay much more upright, and much greater depths to be achieved. The height of the raise can vary largely dependent on mobility levels and desired effects. Generally speaking, the higher the heel raise the more vertical the torso can stay, and the more range of motion can be achieved at the knee and hip joint.
This variation of squat can be very useful for those who have low back issues when the torso inclines, for those with ankle mobility issues, or if you just want to hit the quads really hard! A recent study found that deeper squats with larger ranges of motion improve muscle hypertrophy when compared to half depth squats, so these are great if building size is a goal (3).
Either using plates, weightlifting shoes, a wedge, or a combination of those (basically anything solid that you can place your heels on), stand with the heels on the plates, and perform the squat.
To conclude, in this article we have covered the major anatomy of the squat, including the bones, joints and muscles involved, alongside an in depth look at the technique for all three phases of the lift.
Finally, a number squat variations were covered for those where barbell squatting isn’t currently the best choice, but who still want to get the benefits of this great, fundamental movement.
As always, feel free to ask any questions either in the gym or by sending me a message.
Stay Strong and Move Well,
George Barker

References:
- Biel, A. (2014) Trail Guide to the Body. 5th ed. Winnipeg, Manitoba, Books of Discovery.
- Hartmann, H., Wirth, K., Klusemann, M. (2013) Analysis of the load on the knee joint and vertebral column with changes in squatting depth and weight load. Sports Medicine, 43(10), pp. 993-1008.
- Kubo, K., Ikebukuro, T., Yata, H. (2019) Effects of squat training with different depths on lower limb muscle volumes. European Journal of Applied Physiology. Published ahead of print.
- Nuckols, G (2019) How to Squat: The Definitive Guide [Internet]. Available from: https://www.strongerbyscience.com/how-to-squat/#Creating_full-body_tension [Accessed 26/08/19].
- Nuckols, G. (2014) Speed kills: 2x the intended bar speed yields ~2x the bench press gains [Internet]. Available from https://www.strongerbyscience.com/speed-kills-2x-the-intended-bar-speed-yields-2x-the-bench-press-gains/ [Accessed 28/08/19].
- Rippetoe, M. (2013) Starting Strength: Basic Barbell Training. 3rd ed. Wichita Falls, Texas, The Aasgaard Company.
- Vigotsky, A., Bryanton, M. (2016) Relative Muscle Contributions to Net Joint Moments in the Barbell Back Squat. Conference: American Society of Biomechanics 40th Annual Meeting. North Carolina State University, Raleigh, NC.